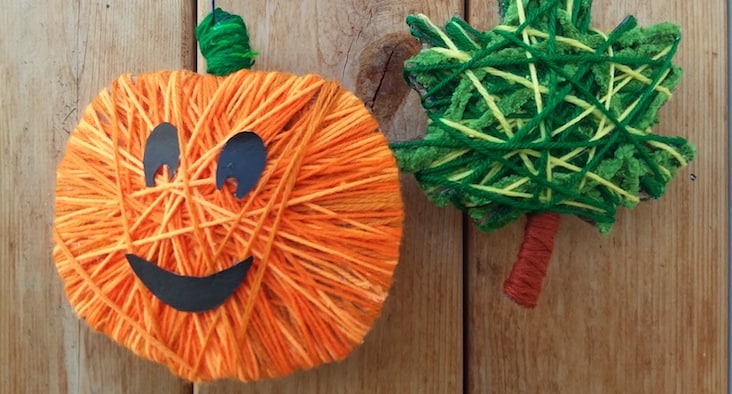
Help your child use odds and ends to make sweet, yarn-wrapped Halloween or harvest decorations.
Reusing ordinary materials from around the house to make art is good for the environment — and an excellent way to spark creativity! This fun art project that reuses leftover bits of yarn celebrates the colors of autumn (and Halloween!). Layer up to three different colors of yarn to get a pretty effect that mimics the variations you’d find in nature. In our pumpkin, three different shades of orange also give the project more visual interest. And the pumpkin grows rounder in the middle as the yarn piles up, making the project more three-dimensional as you go!
Materials
- Pencil
- Autumn-themed cookie cutter or stencil (optional)
- Plain white paper (optional)
- Glue stick
- Cardboard squares about 6 inches by 6 inches
- Scissors
- Hole puncher
- Tempera paint or markers
- Yarn in assorted colors with a focus on fall colors
- School glue
- Black construction paper or cardstock
- Large googly eyes (optional)
Instructions
1. Select your shape. You can draw your own shape, trace an autumn-themed cookie cutter or use a stencil. Another fun option is to print out a simple black-and-white illustration of a leaf, apple, pumpkin, ghost, bat, cat or zombie. (Ideally your shape should be about 6 inches by 6 inches.)
2. Trace your desired shape or use the glue stick to attach your printed shape onto cardboard. This will give you a sturdy surface. Cut out the shape.
3. Punch a hole in the top so that your finished design can be hung.
4. Paint the cardboard (or use markers) to match the color of yarn you will be using. Parts of the cardboard will remain visible. When the first side is dry, flip it over and paint the other side!
5. Select the yarn you want to start with. Use the school glue to secure the first inch of the yarn to the cardboard.
6. Start wrapping the yarn around the cardboard cutout. When you have completed with that color, tuck in the end of the yarn and fasten it down with a little glue. If your project needs a second or third color, select your next length of yarn and start wrapping again in the same way. Be sure to keep the hole that you punched clear so you can display your handiwork!
7. Thread a piece of yarn about 6 inches long through the hole. Knot the ends.
8. If your yarn art needs another level of detail, add eyes, a mouth or a nose — whatever your child thinks helps give expression. Cut these shapes out of black construction paper or cardstock and glue them on top of the yarn. You can also use googly eyes. Your child is the artist. Let them play with what looks good and adds personality!
9. Using the loop of yarn, hang your autumn yarn art up for all to see, or mail to a loved one!
Sharon Jaye Perrins is the lead hospital teaching artist for Children’s Healing Art Project, or CHAP, a nonprofit that brings the healing power of art to kids and families facing medical challenges. She has degrees in architecture and fine arts from the Rhode Island School of Design — and now specializes in making miniature cardboard or Popsicle-stick houses for kids in the hospital to enjoy. Find out more about CHAP and how it has refocused its efforts because of COVID-19 at chappdx.org.
- 24 Free Things to Do with Kids in May - April 25, 2024
- Mother’s Day Events in Portland - April 25, 2024
- May 2024 Digital Issue - April 23, 2024


